reading-notes
Wireframe
Wireframing is a UX design technique that allows designers to establish and arrange the information hierarchy of a website, app, or product. Based on the user research conducted by the UX design team, this approach focuses on how the designer or client wants the user to digest information on a site.
Before developing anything with code, you need to know where all the information is going to go in plain black and white diagrams when designing for the screen. Through the placement of buttons and choices on the diagrams, wireframing is also a wonderful way to learn how a user interacts with your interface.
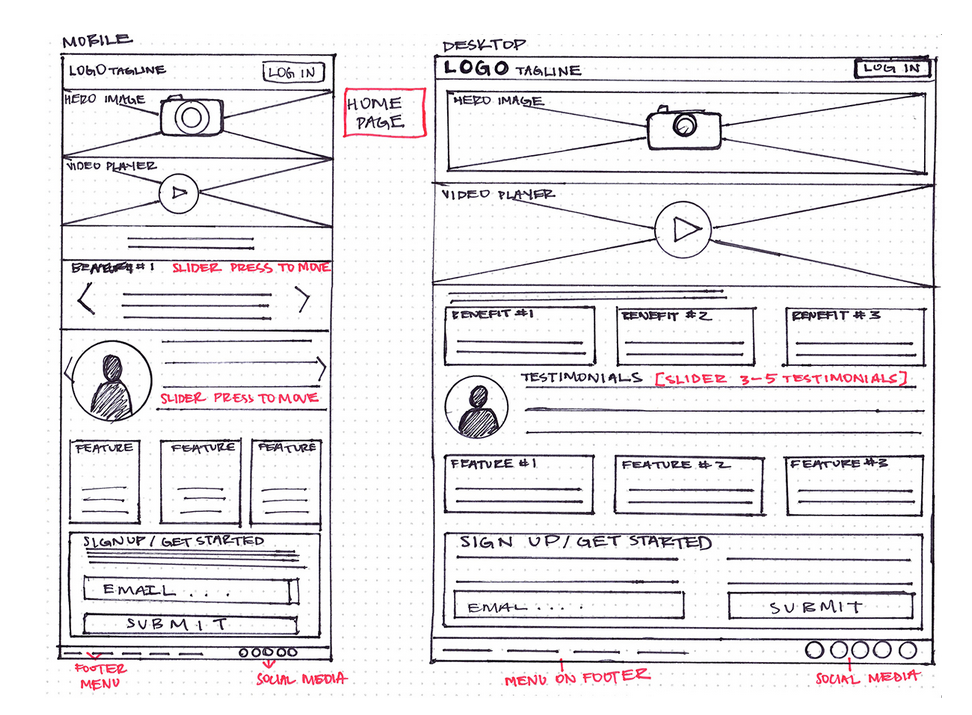
Example of Wireframe
Wireframes created on paper with a pencil or on a whiteboard have the benefit of looking great and being very easy to alter. You may test with end users at every level of ideation and design using paper prototypes. Adjustments made at this stage are significantly easier—and and therefore less costly changes made after coding has begun.

The best tools for wireframing
- UXPin: UXPin has a wide range of functionalities, but one of the best ones is how it facilitates building responsive clickable prototypes directly in your browser.
-
InVision: InVision allows you to get feedback straight from your team and users through clickable mock-ups of your site design. It’s completely free too!
- Wireframe.cc: Wireframe.cc provides you with the technology to create wireframes really quickly within your browser, the online version of pen and paper.
HTML
HTML (HyperText Markup Language) is the most basic building block of the Web. It defines the meaning and structure of web content. Other technologies besides HTML are generally used to describe a web page’s appearance/presentation (CSS) or functionality/behavior (JavaScript). The term “hypertext” refers to links that connect online pages inside a single website or between websites. Links are an important part of the Internet. You become an active participant in the World Wide Web by uploading content to the Internet and linking it to other people’s pages.
HTML elements
HTML uses “markup” to annotate text, images, and other content for display in a Web browser. HTML markup includes special “elements” such as head, title, body, header, footer, article, section, p, div, span, img, aside, audio, canvas, datalist, details, embed, nav, output, progress, video, ul, ol, li and many others.
The main parts of our element are as follows:
- The opening tag: This consists of the name of the element (in this case, p), wrapped in opening and closing angle brackets. This states where the element begins or starts to take effect — in this case where the paragraph begins.
- The closing tag: This is the same as the opening tag, except that it includes a forward slash before the element name. This states where the element ends — in this case where the paragraph ends. Failing to add a closing tag is one of the standard beginner errors and can lead to strange results.
- The content: This is the content of the element, which in this case, is just text.
- The element: The opening tag, the closing tag, and the content together comprise the element.